
We’ve all been there — watching those slick AI-generated UIs and thinking “this is cool, but what if I actually want to save some data?” You build a beautiful form, add some interactivity, but then realize you have nowhere to store anything. It just sits there, looking pretty but ultimately useless.
Getting Started
I spent quite a bit of time exploring how to build an API with storage that wouldn’t cost anything for basic prototypes. After trying several tutorials and tools, I finally found a clear and reliable approach using Google Cloud’s free tier.
This guide shares that approach — showing you how to build two simple APIs that can store and retrieve data, without needing to pay for servers or databases for FREE!
What we’re building:
- API 1: Takes a name and email, stores it in a real database
- API 2: Fetches that data back (all of it, or search by name)
You can see the final result of this in action here — yes, that’s hitting the actual API I created using the below steps. Let’s dive in!
How much is it really free in the “Free Tier”
First, the good news: Google Cloud’s free tier is actually generous. You get Cloud Run (where we’ll host our APIs), Firestore (our database), and enough usage to build and test without paying anything. I’ve been running my APIs for months without hitting the limits.
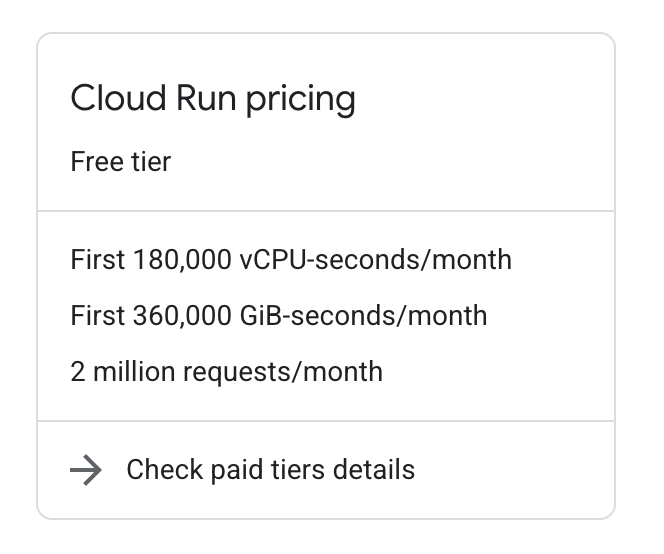
The slightly annoying news: you still need to set up a billing account. Google wants a credit card on file, but as long as you stick to the free tier services (2 million hits per months is beyond generous of what you will need), so rest assured you won’t be charged.
Setting Up Your Project
- Head to the Google Cloud Console and sign in with your Google account
- Click that project dropdown in the top left (Select a Project)and click NEW PROJECT and add your desired project name. I called mine
my-first-api-project, leave the organisation blank. It will take 30 secs to create your project. Land to Project dashboard. - Now we need to enable some APIs (this just gives your project permission to use these services):
- Go to the center Search bar and Search for these, go to first result and tap on enable:
- Cloud Run Admin API (for hosting our code)
- Google Cloud Firestore API (for our database)
- Cloud Build API (usually auto-enabled, but check if you run into issues)
- Go to the center Search bar and Search for these, go to first result and tap on enable:
Creating Your Firestore Database
Now let us setup the firebase database.
- Search for “Firestore” in the console
- Click on “Create a Firestore Database”, keep the name as Untitle (whatever comes pre-filled)
- Click “Select Native Mode”
- Leave everything as default and click “Create Database”. It’ll take 30 seconds to create
That’s it. Seriously. Your database is ready.
Building Your First API: The Data Storer
We’re going to use Cloud Run, which is basically “give me some code and I’ll run it in the cloud without you worrying about servers.”
- Go to “Cloud Run functions” in the console
- Click “Create Service”
- Choose “Continuously deploy from a repository” or use the inline editor
- Service name:
store-user-data - Region: Leave default or if you want to optimise choose the same as your Firestore
- Authentication: “Allow unauthenticated invocations” (for now)
Leave everything else as default and Click on submit. Now we need two files for each API. Paste the following code in the existing files under “Source”:
Entry point: Here’s where I screwed up initially — this MUST be
storeUserData(matching the function name in your index.js)
package.json — tells Cloud Run what dependencies we need:
{
  "name": "store-user-data",
  "version": "1.0.0",
  "dependencies": {
    "@google-cloud/firestore": "^7.1.0"
  }
}
index.js — the actual API logic:
const { Firestore } = require('@google-cloud/firestore');

const firestore = new Firestore();

exports.storeUserData = async (req, res) => {
  // CORS headers (we'll need these later)
  res.setHeader('Access-Control-Allow-Origin', 'https://princejain.me');
  res.setHeader('Access-Control-Allow-Methods', 'GET, POST, OPTIONS');
  res.setHeader('Access-Control-Allow-Headers', 'Content-Type, Authorization');

  // Handle preflight requests
  if (req.method === 'OPTIONS') {
    res.status(204).send('');
    return;
  }

  try {
    const { name, email } = req.body;

    // Add to Firestore (it auto-generates an I, the name of user-profile here will be the name of the db)
    const docRef = await firestore.collection('user-profile').add({
      name: name,
      email: email,
      createdAt: new Date()
    });

    res.json({
      message: 'User data stored successfully!',
      userId: docRef.id
    });
  } catch (error) {
    console.error('Error:', error);
    res.status(500).json({ error: 'Failed to store data' });
  }
};
Testing Your API
Once deployed, you’ll get a URL. Test it with curl:
Something like this:
curl --location 'https://store-user-data-942186759114.europe-west1.run.app' \
--header 'Content-Type: application/json' \
--data-raw '{
      "name": "Prince",
      "email": "prince1@example.com"
    }'
Hit this in postman or on the Test Console and you will get a success message.!
{
    "message": "User data stored successfully.",
    "userId": "5312REyoaBvhhQ5A0DGX"
}
Congratulations! You just stored data in the cloud!
Building Your Second API: The Data Fetcher
Now let’s build the API to get that data back. Same process, different logic. Click on write a function
- Service name:
fetch-user-data - Authentication: “Allow unauthenticated invocations” (for now)
package.json — identical to the first one just change the name to “fetch-data-api”,
{
  "name": "fetch-data-api",
  "version": "1.0.0",
  "description": "API to fetch data from Firestore",
  "main": "index.js",
  "dependencies": {
    "@google-cloud/firestore": "^7.7.0"
  },
  "engines": {
    "node": "20.x || 22.x"
  }
}
index.js
const { Firestore } = require('@google-cloud/firestore');
const firestore = new Firestore();

exports.fetchUsers = async (req, res) => {
  // Set CORS headers - Added POST to Allow-Methods
  res.setHeader('Access-Control-Allow-Origin', 'https://princejain.me'); // Your blog URL
//   res.setHeader('Access-Control-Allow-Origin', '*');
  res.setHeader('Access-Control-Allow-Methods', 'GET, POST, OPTIONS');
  res.setHeader('Access-Control-Allow-Headers', 'Content-Type, Authorization');
  res.setHeader('Access-Control-Max-Age', '3600');

  // Handle OPTIONS preflight request
  if (req.method === 'OPTIONS') {
    res.status(204).send(''); // No Content
    return;
  }

  try {
    const usersCollection = firestore.collection('user-profile');
    let querySnapshot;
    let users = [];

    if (req.method === 'GET') {
      // Fetch all users
      console.log('GET request: Fetching all users.');
      querySnapshot = await usersCollection.get();

      if (querySnapshot.empty) {
        console.log('No users found in collection.');
        res.status(200).json([]);
        return;
      }

      querySnapshot.forEach(doc => {
        users.push({ id: doc.id, ...doc.data() });
      });

      console.log(`Found ${users.length} user(s).`);
      res.status(200).json(users);

    } else if (req.method === 'POST') {
      // Fetch users by name from request body
      const { name: searchName } = req.body; // Destructure 'name' from req.body

      if (!searchName) {
        console.log('POST request: "name" field missing in request body.');
        res.status(400).send({ message: 'Bad Request: "name" is required in the request body for searching.' });
        return;
      }

      console.log(`POST request: Searching for users with name: ${searchName}`);
      querySnapshot = await usersCollection.where('name', '==', searchName).get();

      if (querySnapshot.empty) {
        console.log(`No users found with name: ${searchName}`);
        res.status(200).json([]); // Send empty array if no match
        return;
      }

      querySnapshot.forEach(doc => {
        users.push({ id: doc.id, ...doc.data() });
      });

      console.log(`Found ${users.length} user(s) with name: ${searchName}.`);
      res.status(200).json(users);

    } else {
      // Handle other methods
      console.log(`Method not allowed: ${req.method}`);
      res.setHeader('Allow', 'GET, POST, OPTIONS'); // Inform client about allowed methods
      res.status(405).send({ message: 'Method Not Allowed' });
    }

  } catch (error) {
    console.error('Error processing request:', error);
    if (error.message && error.message.includes('requires an index')) {
      res.status(500).send({
        message: 'Internal Server Error: A database index is likely required for this query. Please check the logs.',
        detail: error.message
      });
    } else {
      res.status(500).send({ message: 'Internal Server Error: Could not process request.' });
    }
  }
};
Deploy the Second Service
Get all users:
curl https://fetch-user-data-513996533867.europe-west1.run.app
Search for a specific user:
curl -X POST https://fetch-user-data-513996533867.europe-west1.run.app \
  -H "Content-Type: application/json" \
  -d '{"name": "Prince"}'
The CORS Headache (And How I Fixed It)
Here’s where things got interesting. My APIs worked perfectly in isolation, but the moment I tried calling them from my website (princejain.me), I got hit with CORS errors.
CORS (Cross-Origin Resource Sharing) is basically the browser saying “Hey, this website is trying to call an API on a different domain. Are you sure that’s okay?”
The fix was adding those CORS headers you saw in the code above. But there’s a catch — browsers sometimes send a “preflight” OPTIONS request first, which is why we handle that separately.
This took me way longer to figure out than I care to admit. The internet is full of CORS solutions that don’t quite work, but the approach above has been rock-solid for me.
What You’ve Actually Built
Let’s take a step back and appreciate what just happened:
- You have a real database in the cloud (Firestore)
- You have two live API endpoints that can store and retrieve data
- Your APIs can be called from anywhere on the internet
- Everything is running on enterprise-grade infrastructure
- And it’s all completely free (within reasonable usage limits)
This is pretty incredible when you think about it. A few years ago, this would have required server management, database administration, and a monthly hosting bill.
Beyond This Tutorial
This is just the beginning. Once you’re comfortable with this setup, you can explore:
- Adding authentication (Firebase Auth is great for this)
- Implementing proper API keys
- Adding more complex data validation
- Building more sophisticated queries
- Adding caching for better performance
But for now, you have something that works, something real, and something you built yourself. That’s worth celebrating.